Tuesday, October 21, 2014

Hot Designs Review

 I had been eyeing these for some time, but never ponied up the $14.95 a box, in fear of it not working.  When I saw them marked down to $9.88 each, I decided to go for it. I bought both the color sets that were on sale.
Hot Designs, here I come!
 Of course, my nails were super short at the time, so I figured I'd just wait a couple weeks for them to grow out before using these for blog pictures and review.  My daughter was going insane seeing the boxes just sitting here on the end table, so on a day when her brothers were being "big jerks" to her, I decided it was time for a Girly Day and opened them up.  (Turns out that was a good thing because my nails are still awful 2 months later.)
The tip I broke by not reading instructions
I have to admit that I didn't read the instructions that stated " if no product comes out use the included pin to remove any possible clog" or something like that, and I ruined the white pen by pressing it on the table trying to get it going.  THAT was when I looked at the instructions and quickly fixed the three others that didn't work straight out of the package.

You can twist the pen open at the middle to get to the standard nail polish brush, or remove the end caps to get to the pens.  Some of the polishes were good with one coat, some took two, but all dried swiftly and didn't require a long wait before starting in with the art pen portions.


 I did one of her hands as closely as I could to what was in the pictures, and she did the other hand herself.  I have to say they worked pretty good!  Even the nails my 6 year old daughter did came out halfway decent, and she loved them all.  Definitely easier to use than standard nail art brushes.

I will say they do leave a rather raised effect to the designs which may seem odd if you are new to nail art which absolutely requires a good layer of top coat.  Without it, my daughter's designs only lasted a couple days.  (She was tired and over it by then so she didn't want to wait for top coat to dry.)  I do think that if I had used a good base coat and finished off with top coat they would have lasted a lot longer.

All in all, I think these are a good buy for novices in nail art, girls, or for a special occasion like a holiday or festival.  I totally plan on using these again to rock some cool Halloween and Christmas nails because they only need to look nifty for a day or two.


Sunday, October 19, 2014

Cra-Z-Loom Vs. Fun Loom etc.

$5 on clearance. normally $9.88.

approx $10


These are recommended for ages 8 and up.
Both came with a loom, 600 loops, a hook, instructions, and 24 fasteners.
I got these for my 6 and 7 year old kids.  The instructions for the simplest bracelet are the same.  I was able to understand them easily and to walk my kids through how to place the loops on the looms with no problems. They both got pretty quickly how to hook and move the loops properly, but both needed help if a loop popped off or went wonky.  That's ok.  I expected to have to help fix errors.  For the most part though, they can make the simple bracelets themselves. I don't think they are ready for the more difficult ones, and I kind of doubt the average 8 year old would be either.

$1.97 ea.
Loops:  Cra-Z-Loom comes with latex free rubber bands that are thinner and look like regular rubber bands.  Fun Loom comes with silicone bands that are thicker and semi transparent. Bracelets made with the rubber bands come out somewhat bigger and are by far stretchier. Neither would influence my buying decision, as refills can be purchased in a variety of colors and styles from solids, to see through, to glow in the dark, to tie dye, sparkly, and even scented.  Personally, I prefer the silicone bands against my skin, but obviously that's totally a matter of opinion.

Looms: The Fun Loom has more rows across (4x15) which allows for more complex patterns without having to buy another loom, but the recesses in the pegs of the loom are harder to fit the hook in.  Cra-Z-Loom (3x14) pegs are numbered  making instructions easier to follow, but the hooked tip of the pegs makes it harder to move the loops from one peg to another in all but one direction. Both allow for additional looms to be attached at the sides or the ends.  (longer or wider)


Hooks: Fun Loom has a shorter more ergonomic handle, but a smallish hook which you need to be careful to not drop loops off of.  Cra-Z-Loom has a much longer handle than needed, making it a bit awkward to use, but the shape of its actual hook makes it work well with the loops.

Other looms on the market:
Wonder Loom: $11.59  3x13 cannot add looms to the sides
Rainbow Loom: $14.99   3x13 cannot add looms to sides. This is rumored to be the Cadillac of looms, but the hook looks difficult to use to me.
Cra-Z-Art Shimmer & Sparkle Loom: $12.99  identical to the Cra-Z-Loom but is pink
Cra-Z-Art Super Loom: $18.75  (6x14)  the same as if you put 2 regular Cra-Z-Looms together side by side

I used both looms for the simple bracelet, and the fishtail bracelets here to make my decision.

If you are buying one of these for a younger child
Fishtail Pattern
who is likely to be only making the simplest bracelets, I would recommend the Cra-Z-Loom because both my younger kids had an easier time with it.

If you want one for a teen or even yourself, and plan on making the more complex bracelets, I would absolutely recommend the Fun Loom instead.  It's smaller tipped pegs make the more complex patterns (where loops need to be pulled in multiple directions) simpler to complete.  With the Fun Loom I felt I was fighting against the pegs when I needed to move a loop in any direction but one.

Also, I should probably warn you.  These things are kind of addictive.  My 7 year old son made several bracelets a day for at least a week.  I needed to buy refills after a few days.  I found myself breaking the looms out and making bracelets several times as well, and I still want to try to make one or two of the super complex patterns.


Sunday, October 12, 2014

A Realistic Approach to Emergency Preparedness

Yes, I have caught myself pinning storms of emergency preparedness items that range from crank powered flashlights all the way to complete 1 year supplies of dried and canned food for a family of five.

No, I am not digging a bunker in my back yard in preparation for a zombie apocalypse.  Pinterest just does that kind of downward spiral for me.

However, I DO believe a family should have supplies on hand for emergencies.

 I live in Upstate NY where we get snow.  Lots and lots of snow.  We get Ice Storms.  We get Microbursts. Any of these alone can close roads and cause power outages for days at a time.  In March 1991 an ice storm combined with heavy snow putting hundreds of thousands trapped at home without heat or electricity for up to 12 days.  The North American Ice Storm of 1998 left millions in the dark from days to weeks.


Other parts of the country face the same potential temporary loss of services due to hurricanes, tornadoes, and earthquakes.  People can be quarantined in their homes due to various diseases like Ebola.

None of these situations really offer any ability to last minute shop.  Even if you have a day warning of a severe storm, you are likely to find store shelves bare of essentials like bread and milk. The buying frenzy alone is reason enough to stay home if at all possible.

As adults, and even more so as parents, we need to be prepared for up to two weeks survival trapped at home without power.


But, how do you do that without spending a fortune?  How do you not waste anything? How do you know you are REALLY ready?

As some prediction models indicate this will be a heavy snow winter, I have been putting more thought into this than I have in the past.  The internet has a million ideas and wading through them can be an overwhelming task that leaves you feeling like a doomsday prepper, so I decided to let you know what I do.

I did make my plan based on the assumption that I can exit my house to get to at least my own yard and grill.  I could alternately use my gas stove as long as I have matches or a lighter with which to light it.  Do NOT try to bring a grill inside. Carbon monoxide is deadly.

I started with the most expensive item on my need list.  An extra tank for my propane grill.  (Alternately, extra bags of coal for a regular grill.)  Yes, that is literally the most expensive item I need to keep on hand.

I made a one week meal plan of foods I am sure my family will all eat, that can be made with either no cooking at all or with just the grill.  Don't waste time and money on survival meals your kids won't eat.  That will just make everyone miserable.  And, yes you can make almost anything on a grill if you try. The hardest part was coming up with meals that didn't require refrigerated/perishable items.

I quickly came to the conclusion that I would be ok with incorporating a lot of pre-made/processed meals that I would normally use as treat meals or "mommy is too sick to cook" meals because, let's face it, perfect nutrition isn't probably going to be our biggest concern in an emergency, and it will be for a short period of time.  I can go back to carrot stick snacks for the kids when life is normal again.  Whatever it takes to prevent a mutiny, right?

I do keep a couple loaves of bread in the freezer.  They can be thawed out at the time of the emergency/disaster and will easily stay good for one to two weeks. I also keep a couple half gallons of milk in there for the same thing.  They won't stay good as long, but if you can put them in the snow they'll be good for a few days after thawing.

I obviously realize we would spend the first couple days using up perishables to avoid waste, but after that we would go to the meal plan.  It can be repeated as many times as necessary until the situation is resolved.

I made sure to add a treat/dessert/snack for each day. Everyone is in a better mood if they can have a snack in a bad situation.  I made sure to plan my meals with canned and shelf stable foods.  And, I made sure to only use items we normally buy anyhow.  No one wants an emergency supply they need to throw out every 6 months and replace.  That just costs too much. (The two exceptions to this were a box of powdered milk and a container of instant coffee as they basically stay good forever.)

Store your food supplies in a tote/bin if they are in boxes or bags to keep pests away.  I also find this makes it easier to not accidentally mix them into our regular food supply.

I found basics like pancake mix that only needs to have water added, rice, anything in a can, crackers, trail mix, and lots of other things qualify if you rotate your supply. I found out that condiment packets need no refrigeration for years, so they are a great addition.  Especially mayo packets.  With mayo packets you can absolutely have tuna sandwiches!  Powdered creamer if you use it in your coffee or tea. Kool aid packets and tea bags. Honey can be used in place of sugar if you run out.  You really want to make what is a horrible experience as painless as possible.

By using items in your supply that you normally use anyhow, you can start buying a few things at a time.  Say you have rice on your grocery list this week and it's part of your emergency plan.  Buy 2 instead of 1, and toss one in your emergency bin.  The next time you buy another for home, cycle it into the bin and use the one you had stored there.  I've found that by doing this for us, nothing lives in there long enough to go bad. Nearly everything you buy in a store in a bag, box, or can is going to be good for at least 6 months if you haven't opened it. I often write purchase dates on things with my trusty Sharpie before tossing them in the bin to be absolutely sure nothing gets old.

Keep only what you will need for those meals in your emergency bins, and resist the urge to use them instead of shopping.

Other necessities are a few cans of sterno for small cooking like soup or coffee, batteries for flashlights or glow sticks if the nights will be long.  (People get a little crazy sitting in the dark and cold 16 hours a day and you can only sleep so much.) Water, of course. The pipes could freeze, the pump could die. You'll need it to make your drinks and to cook with.

Before we get to household concerns, lets look at some things you may have not thought of.
manual can opener.  You're going to need it.
Scissors.  Those food packages are often hard to open.
A colander.  You'll need to drain rice, pasta, and canned veggies.
Basic first aid products like band-aids, neosporin, tweezers, gauze, medical tape, aspirin/Tylenol.
Toilet paper.  Yes, two weeks worth.  You do NOT want to run out of that.
And, 2 or 3 five gallon buckets with lids.  If your pipes freeze or break, you will not be able to flush your toilet and you'll be thankful for that bucket with a lid.  Icky, but it works.
Pet supplies!!  Food, treats, litter, toys.  Again, 2 weeks worth.  Nobody wants to watch Fido starve.  He is family, too.
Baby wipes.  They are good for everything from cleaning up spills to personal hygiene.  It may not be a shower, but it'll get the stink off and you don't need water to do it.
Dry shampoo.  I don't think any of us wants to go two weeks without getting the grease out of our hair.
Paper plates, cups, tableware.  You may not be able to wash dishes.
Ziplock bags to store the leftovers from an unfinished meal. It's not a time for tossing extra. You can eat the rest of lunch for dinner.
Garbage bags because those food packages and paper plates add up and they are good liners for the potty bucket for quick removal of waste.

Keeping busy will be key to sanity.  If you can go outside during the day, do so.  Go for a walk.  Make a snowman.  Clean up the yard.  Have books, board games, and cards to play with (and if you're into that kind of thing a craft available also). A game or twelve of Candy Land or a few pages in a coloring book can keep the kids from going at each other's throats.

If you live where it gets cold, blankets are key.  The more the better.  You'll want them for a lot of things. Hang them over doors to keep out drafts.  Put them over windows to avoid heat loss through the glass. Lay them on the floors for extra insulation.  They don't need to be new or pretty.  They need to just BE.  You can get extras super cheap at a second hand store like VOA or Salvation Army to keep stuffed in a closet.

You'll need to pick one room to hole up in.  We use the living room because it is the largest and offers several sleeping possibilities.  Hang blankets over any doorway that has no door, and close any doors you can.  Close the heat vents in every room.  The cold air will fly in and your heat will seep out if you don't. If they don't close, block them off with a towel or pillow. You want to trap as much body heat in the room as possible.  Leave the room as little as possible.

Candles help provide light and heat also, but always be careful with them.

I know this may sound odd, but consider keeping a cheap tent on hand to set up in your chosen room. If it gets truly cold, staying inside a tent can hold enough body heat to raise the ambient temperature as much as 15 degrees. This can be all the difference between shivering all night and sleeping comfortably.

Know where your hats, gloves and scarves are. In the cold you'll be glad for the extra layers.  Warm, cozy clothes will be your friend.  It's crunch time.  You don't need to look pretty.

When collecting your supplies, remember you don't need to do it all at once.  Either keep a checklist and fill it out a couple items at a time in the way I mentioned earlier, or buy one meal worth each time you shop.  Either way, you will have a complete two week supply within a couple months. Gradually replace/cycle your food items as you buy new for the regular house supplies.

Keep food you are capable of making, that you know your family will eat on hand, something to amuse yourselves, and the supplies mentioned earlier and you should make it through like champs!!


Friday, September 26, 2014

Maybelline The Falsies Volum' Express Mascara Review

I walked into Rite Aid trying to find a good mascara, and found myself facing a store-length wall of makeup with no less than a hundred choices in mascara alone.

I had just returned one and wanted to stay in the same price range.  After going up and down the wall over and over, I settled near the middle and froze, somewhat overwhelmed.  Nothing stood out.  The names were all similar.  They all promised the same things (I think?) with different words: plump, volumize, lengthen, curl, magnify....

So, I took a deep breath and focused on only the brand names on the banners above it all and realized I was in front of the Maybelline section.  I had owned a few Maybelline products in the past.  None stood out in my mind as amazing, but I didn't recall ever tossing any out because I disliked it either.  It's a well known brand.  You see commercials all the time.  Why not?  That narrows it down.  Now to choose from their dozen or so makes.
Maybelline Mascara Section

There are blue bottles, and yellow, and pink, and purple, and green, black, silver.....

You know what?  Let's buy that one.  Just because the name on it makes the perpetual 12 year old inside my mind giggle.  The Falsies.  It's  $9.79.  

On the way to the register, I happened to glance at an end cap display.  Lo and behold, there was a 2 pack of the very same thing for only 20 cents more!  Of course, I took that instead.


Naked Lashes

I should probably have started by saying that I have very short, sparse lashes.  I have spent over 20 years trying to find an affordable mascara that would help, and I never have.... until now.

I am AMAZED.

I applied 3 coats of this mascara (don't dry between coats), and the difference was stunning to me.  I could have applied more (and have since this test) for even better results, but for the purposes of this test I just did a normal number of swipes as if I were in a hurry to go somewhere.
The Falsies by Mabelline
 FYI: Do you have any idea how hard it is to take a clear picture of your own eye with a phone?

Drug store mascara could never do anything like this 20 years ago. This stuff gives me visible lashes even from a distance, even with my glasses on.

I don't know if I got lucky and bought the best option on the (drugstore) market right off the bat, and I will definitely buy others to see.  I do know there are more expensive products that do even more (fiber lash mascaras like Younique and Love Alpha Cashmere Micronesia. I've seen the videos and intend to try them eventually), but for now, and for the price, I am completely IN LOVE with The Falsies.  It works very well and fits almost any budget.


Wednesday, September 24, 2014

How My Body Has Changed: The Good, The Bad, And The Ugly


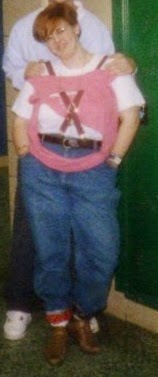
I was never a chubby child.  However, I WAS the first in my class to blossom... by YEARS.  I was 9 in this picture, and I loved that sweatshirt because it hid that I needed to wear a bra already.  I mean, by the time my friends were getting their first training bras because they "wanted them" in 6th grade, I was already a DD. I was horrifically self-conscious about it and often wore big baggy clothes to try to hide it.  This, of course, just made me look busty AND fat.

By the time I was 14, I was on prescription pain killers and muscle relaxers because of the damage (tearing) to my back muscles.  Between being busty and large framed, and at that point rather tall for my age, I wanted to do ANYTHING to be smaller.  I was 5'4" tall, weighed 120 pounds, and I had a 47" bust.  I also took a snug size 14 jeans.

Age 14
I did not understand that I wasn't fat.  I really didn't.  So, I decided to exercise and diet.   I rode my bike about 15 miles a day and ate only 1/2 an apple, 2 tablespoons of peanut butter, and 2 liters of Kool-Aid a day.  That's it.  Of course, I lost weight.  I lost about 20 pounds in a month, maybe more. But, all that did was get me to squeeze into a tight size 13 jeans and destroy my eating habits for life.  I continued on for a couple more months, but never got any smaller.  Honestly, after a few months of it, I'm lucky I didn't end up in a hospital or worse.

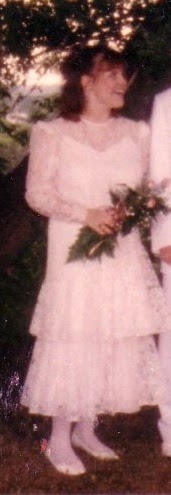
This picture is BEFORE I started that crazy diet. I had to buy that dress several sizes too big in order to accommodate my bust.

Never since have I been able to eat what would be considered "normally".  I cook and eat with my family because that's what I am supposed to do.  Left to my own devices I probably wouldn't even have that much. 
Age 16

By high school, I could no longer even find bras to buy that fit.  I dressed rather bizarrely so that may have helped, but I don't know.  I'm sure sometimes my crazy wardrobe made me look worse.  I just did my thing and didn't really care too much what anyone thought.

As soon as I turned 18 I had a massive breast reduction (13.5 lbs.) which left me at 119 lbs. again and still a full D cup. Though I required some touch up surgery after the scar tissue softened (not uncommon in such a drastic reduction), I was happy with the results.  I sadly, still thought my pants size determined if I was "fat" or not, and my 14s didn't fare well in my mind against my friends' 6s, 4s, and 2s. I still couldn't wrap my head around the fact that you could count my ribs but I needed such big pants.  I couldn't get that it was my bone and muscle structure and not fat.  That took me years.  I'm actually surprised I finally got there given that I gained weight constantly since then.

I think, looking back, that I was most happy with myself and felt my most attractive (dare I say I felt sexy?) at about 140 lbs. in my early 20s.

I don't want to be skinny again.  It's not healthy for me and I really don't find it beautiful.  If I could snap my fingers and magically be any weight I wanted, I would probably choose that 140.  At my low moments I curse my body for refusing to stay there (or at least near there).

Age 25
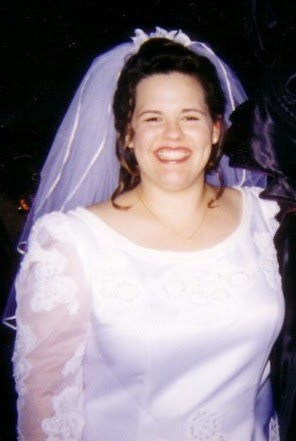
 Instead, I have gained weight steadily, year after year.  By the time I got married (the first time) at age of 25, I was a size 18.

When I cleared the 200 lb. mark, I went to the doctor to ask for help. They told me to eat less, but I didn't understand how to do that given how little I ate already.  They told me I could see a nutritionist to "improve my food choices" but I didn't see how I could improve my largely vegetable based diet.  I went home with no answers and trudged on.

I tracked my intake with My Fitness Pal. I tracked every sip and morsel I consumed for almost 2 years.  I didn't change any of my habits.  I just logged faithfully and accurately.  I wanted to be able to show the doctors that I really DON'T overeat and I really don't eat lots of fatty junk.  I couldn't think of any other way to get them to understand.

"Sedentary women ages 19 to 25 need 2,000 calories a day; sedentary women ages 26 to 50 need 1,800 calories a day." -USDA, WebMD, etc.

2010 Size 22.
I found that I average 900 calories a day.  My entire adult life, I have been eating about 900 calories a day.  Let me say it again so it will sink in.  Nine. Hundred. Calories. Per. Day.  Yet, I continue gaining weight.

Early last year I inexplicably, suddenly, gained 60 lbs in only 4 months.  I also started having massive dizzy/faint spells.  That scared me, so back to the doctor I went.

I begged for help.  Their answer was still "eat less" or get gastric bypass surgery.  I explained AGAIN how much I eat.  Showed the printouts.  Begged for an answer that didn't mean flirting with anorexia again.  So, they sent me out the door with no answers and a list of blood tests to have done.

My blood work wasn't very helpful.  My cholesterol is fantastic (reinforcing the truth of my healthy food choices).  My blood sugar was normal (amazing at my weight).  I do have an under-active thyroid, but I take medication for that.  I tested positive for an autoimmune disease, but after ruling out Lupus, the specialist I was sent to basically ignored it and went right back to telling me to eat less and lose weight.  He lectured me on how I must be over-eating and repeatedly telling me being fat was why the arthritis in my back and knees hurt so much.  He made me cry he was so nasty.

I'm now so heavy that walking up the stairs to my bedroom at night winds me like a heavy workout.  I have chronic migraines and insomnia. I have severe arthritis in my knees and they frequently give out on my without warning.  Also, in the last few years, I have become allergic to the world (practically) including sunlight.  My exercise options are limited to mostly light housework and shopping.  I'm about 260 lbs. and a size 3x/24.

I've tried supplements to improve metabolism, mood, and energy.  Probiotics, B boosters, raspberry ketones, cinnamon, etc.  All to no avail.  I've considered, and may still try, garcina cambogia if my doctor says it's safe.  I will NOT undergo unnecessary surgery or take amphetamines even though my weight makes them technically viable options according to medical insurance.

At this point, I have pretty much given up on doctors.  They don't have any answers for me.  I go when I'm sick and that's about it.

I'm trying to get an elliptical or treadmill to use at home as much as the pain allows.  When/if I do get one, I may possibly keep track of any progress in posts.  I don't know.

Mostly though, I'm trying to be happy the way I am.  I'm trying to have fun with makeup and nails and hair so I can remind myself I'm still feminine and maybe even pretty, even if I am more curvy than I'd prefer.  I'm trying to stop being angry at what I lost, and to start being happy with what I've got.  And, I think I'm winning.


Sunday, September 21, 2014

Forever Fragrant Fresh Sticks Review


In the box:  Round glass jar, 20 "fresh sticks" in a ziplock type bag, instructions (Place sticks in jar and put in a well ventilated area), and an ad for another product.

Simple enough!!

Claims: Eliminates odors for up to 2 years.  No oils.  No mess.  Eliminates odors from smoking, pets, cooking, musty rooms, and more.

Cost: $9.99 at my local Rite Aid


I bought the linen scent.  It smells like pretty much every other linen scent air freshener on the market which is good.  I hate when things don't smell like I expect them to.

The fresh sticks themselves feel like regular plastic.  There is no oil to soak into the sticks.  No spray to put on them.  No need to plug it in.  Just these plastic sticks in a jar.  There is no oily residue on them so I did not feel any need to wash my hands after setting this up and placing it on the mantel in my 14'x18' (252 sq.ft.) living room.

We have 3 cats, a dog, and smokers in our house so we should theoretically be the ultimate test for this item.

1 week check in:
I did have to move it from my mantel after only a few hours because it was only a couple feet from my favorite seat on the couch and the smell was a bit overwhelming and gave me a headache.  I instead put it on top of a short book case across the room.  Unfortunately, from there I can't smell it at all.  I felt certain anyone walking in our door would be well aware there are pets and smokers living here.

I can smell it as I walk by it, but it has never filled the room with the linen scent and doesn't seem to be doing much, if anything, more than a few feet away.  I suppose if I bought 3 or 4 and spread them around the room we would smell them all the time, but it just feels like it should be doing more. Then again, lets face it, as far as I can tell, nothing other than Febreeze can trump the smell of cigarettes and wet dog.

2 week check in:
After the disappointing first week I moved it to the porch to test it in smaller room and see if it was any better. Ours measures about 11'x7'. (77 sq.ft.) Three sides of it are almost entirely glass so it gets very hot in there on sunny days, and quite cold in there at night.

Usually when I empty the kitchen garbage, I tie the bag shut and put it in the porch for hubby to toss in the outside tote when he gets home from (or leaves for) work.  This does not make for a nice smelling porch.  Especially if we do the same with a bag of used cat litter for a couple hours. Again, this should be a good test of the product.

I have to say it actually worked pretty good in the porch!  Yes, in the heat of the day, sometimes the garbage still won the war; but, for the most part, the linen scent was still detectable, and the porch definitely got non-stinky a lot faster than normal once the garbage actually went out to the toter.

3 week check in:
By now I was determined to see just what size room this thing can handle, so after the week in the porch, I moved my Fresh Sticks to my teen son's messy room.  It measures 10'x14' (140 sq. ft.) and comes equipped with all the usual nasty teen boy smells: feet, armpits, dirty laundry that is always on the floor instead of in a basket, and probably some kind of old food lost Lord only knows where.

We can't even smell them in there.  Not unless you put your face right up to the sticks.  I don't know for sure at this point if it's just another "too big" room, or if they have just worn out already.  I think it's the latter of the two.  Less than a month.  How disappointing. I don't know if this is the norm for Fresh Sticks or if the heat of the porch accelerated their demise.

All in all, I would say these are worth a try if you wanted to put them in a small room like a bathroom or large closet, but I would not recommend them for much more.  I will definitely not be buying enough for my 2,000 sq. ft. home.  If you want to deodorize larger rooms, I would stick to something like the Febreeze Noticeables or Air Wick Freshmatic. Personally, I'll probably stick to buying a can of Glade or Febreeze every month or two and having one of the Noticeables in my living room.


Saturday, September 20, 2014

Coming Back To Makeup After Years Away

All through high school I wore full makeup almost daily.  Living with my father, I was left to my own devices regarding what I used, but I had to buy it myself and in stores we were already going to. In a small town, and on a teen babysitter's budget in the 80s, that left me with the very limited choices available in our grocery store or at CVS the few times a year we had to go there for prescriptions.

I wanted to insert a picture of the current version of this store's selection, but they don't even have a makeup section any more.  :(

There really isn't much decision making involved when your choices are so limited: maybe 4 foundations, 4 colors of eyeliner, 2 or 3 (all black) mascaras, probably less than ten eye shadow colors, and a pink or brown blush. I think there were only 2 brands. (Wet-N-Wild and Cover Girl?)   It really is kind of a miracle I didn't look like a clown.

I tried to pay attention to what other girls did that I didn't like (oh, the mountains of blue eye shadow!).
I got a couple books on how to apply makeup, and did the best I could with what I had. Most importantly, I understood that less is more.

I think I was about a decade ahead of the girls I grew up with in learning how to properly apply multiple shades of eye shadow. Honestly, some of them are still just slapping on a pile of dark color on the eye lid and thinking its attractive and done.  They're likely to be the ones still using Baby Soft perfume and Aqua Net.

Anyhow, I wore those drugstore makeups all through high school and part of college.  I really just didn't know there were more choices aside from Avon until a friend became a Mary Kay consultant. I let her do her whole skin care and makeover presentation on me, and although I didn't like her application style, I actually DID like the products themselves.
I dropped what was, for a 20 year old in their first apartment, a small fortune on the complete kit. The complete skin care line (face and body), the full face worth of makeup (concealer, foundation, blush, eye shadow, eye liner, lipstick, and lip gloss), and even the hot pink hanging travel bag with the clear zip pockets to keep it all organized in.
 This is the current version of the bag, though I think my larger flat pink one was much cuter. I think it all cost me about $250, and back then they allowed it to be split into 3 payments though I didn't. 

By that time I was working a rather physical, very dirty, outdoor job in the summer; so, I mostly only wore makeup if I went out in the evening or on my weekends.  That was the beginning of the end of makeup for me... a job that made makeup impractical and somewhat unnecessary with the tan.  Eventually makeup became a "winter thing", and then a "date night" thing, and over the years it dwindled down to a "weddings and funerals" thing.

After my third child and escaping an abusive relationship, I was very unhappy with how I looked.  I didn't feel pretty. I didn't even feel feminine. So, I started doing my nails and growing my hair out, and even bought some new (cheap) makeup.  Anything I could to find that confident part of myself again.

It's been six years and I still don't wear full makeup often.  Usually I'm just sporting some mascara and lipstick. I don't always do my nails because I prefer to only do that when they are long enough for my taste, but I still do them pretty often.

Due to medical issues (I'll save that for another post), I have become increasingly unhappy with my appearance but have found that I am similarly increasingly more pleased when I do something for myself, something to make me feel more feminine.

I started doing cute pedicures and wearing eyeliner.  I recently cut off my waist length hair into a shoulder length bob and had it frosted to mask my grays. (Wow, what a difference between the 2 cameras on my phone! I swear my haircut isn't lopsided even though it appears so in this pic for some reason.)
 I bought 3 or 4 cute tops that actually fit in a relatively flattering way. And, I started playing with the new to me MUCH wider world of makeup available on a budget.

This is actually the smallest makeup section nearby now!  It's one entire wall of the store! Wow!

Experimenting in a somewhat random manner with all the new inexpensive options is something I really look forward to.  I will enjoy sharing my successes, failures, disappointments, and surprises with you!!